You don’t have to spend a zillion dollars on your first antenna to get great performance with your new HF station.
Sure, a stacked Yagi with a 200 foot tower would be nice, but it’s not where you want to start.
Let’s cover the top 5 HF Radio Antennas for new hams, coming up.
Top HF Ham Radio Antennas
Let’s not minimize the importance of a good antenna. Your incoming and outgoing signals depend on it.
As a new ham you’re going to have to deal with lots of trade offs as you decide on an HF antenna. Money, available space, bands you want to use are big factors in choosing an HF antenna. Let’s go through 5 HF antennas you might consider for your first HF station.
Don’t just stop this video when you find an antenna you like. Later we’ll tell you about tools to get your antennas optimized. We’ve also got a few ideas for antennas you can grow into, and a couple that will work in a pinch.
Interested in microphones for your HF station? Watch this video!
1. End Fed Non Resonant
Our first pick is the non-resonant end fed antenna. This antenna is great because it’s affordable and easy to install – all you need is a tree and some space!
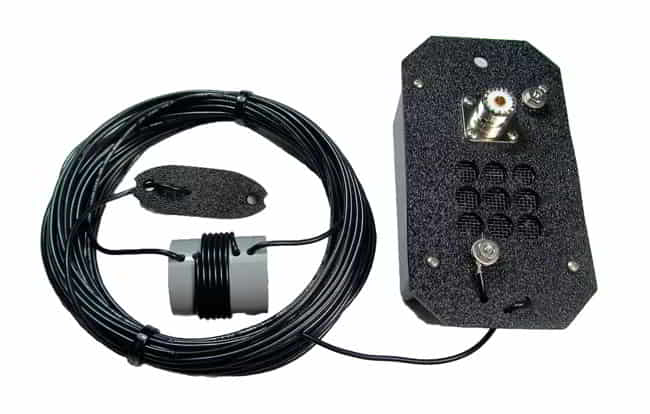
Also called the End Fed Long Wire, it’s a cable attached to a 9:1 balun that will use part of the feedline coax to radiate. If you don’t know the term balun, it stands for “balanced to unbalanced” and is where the coax (unbalanced line) is matched to the antenna.
Since the End Fed Half Wave is a “long wire” there is no need to do much analysis or “tuning” to make it work. Just connect up the distant end of the antenna in a tree and the balun end near your operating position. Connect the antenna to the feedline, connect that to your radio’s tuner, and you are good to get on the air. That’s why we chose it in our HF Masterclass, our online class that teaches you how to get on HF step by step.
TOP END FED HALF WAVE ANTENNAS!
As we mentioned in the beginning, one of the things you will need to manage with all the antennas we discuss is length. An 80 meter End Fed Half Wave antenna is about 135 feet long, and usually covers many bands between 80 and 6 meters. A 40 to 6 meter version will be about 70 feet. Check your available space and then match that to the product information before you buy.
How much will you spend? We’ve seen End Fed Half Wave antennas cost anywhere from $90-200 depending on the parts it comes with and if it’s single or multi-band.
When choosing an end fed half wave, watch the power rating for the antenna so you don’t deliver too much power and damage your equipment. Some companies make lightweight QRP versions that only support 20 watts. Others might support up to a kilowatt maximum if they are made with more robust parts.
If this is going to be your first antenna, and it’s a good choice for one, it’s probably better to buy new than try and build and adjust. That way you can isolate problems to the operator instead of the gear.
Plus, you can always use your end-fed wire antenna as a portable option down the road even if you upgrade your home antenna.
2. Wire Dipole

If you polled 100 hams using HF today, I’ll bet a majority will tell you that a wire dipole was their first HF antenna. It’s simple to build and use. Many of the principles you have or will study in the General license course focus on the dipole.
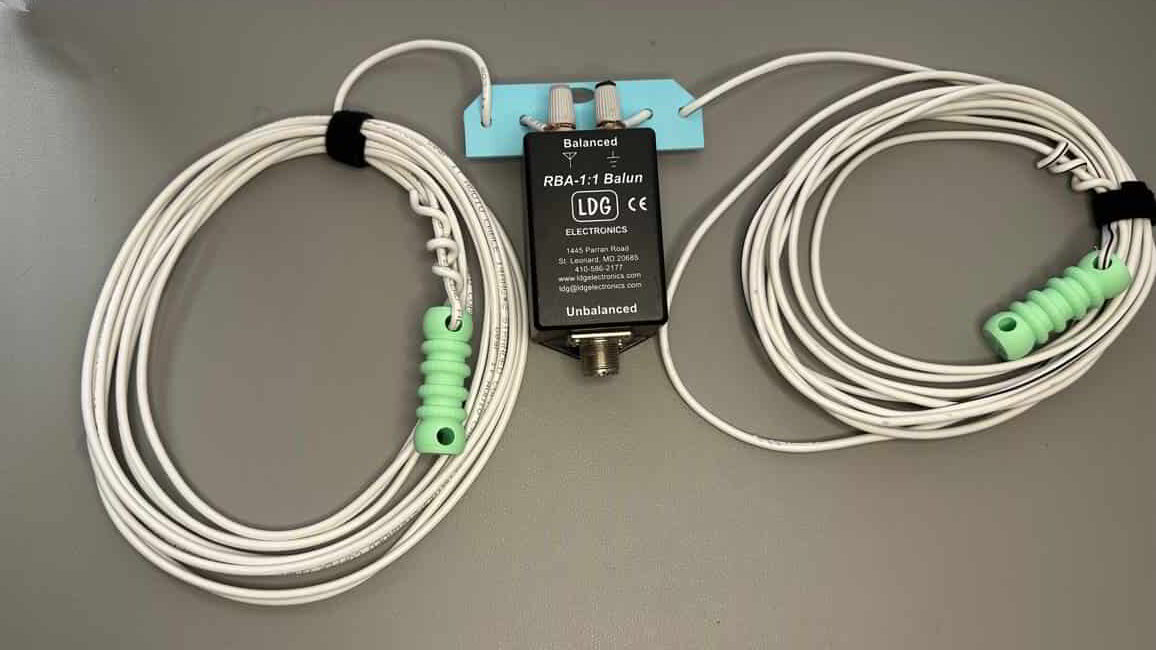
So what is a dipole? It’s two (di) wires (poles) connected in the middle. When matched well, it operates nicely with a 50 ohms impedance. That’s important to match most modern radios and coax. The wires are usually one-quarter-wavelength on each side. That makes up an antenna with a half-wavelength total. For 20 meters that’s around 33 feet across, or 16.5 feet on each side.
So, should you build or buy your dipole? I’ve built a dipole antenna directly into an SO-239 with no baluns, but I’ve been doing this a while. If you want to, you can go the route we did in our HF Masterclass example. Get some 16 gauge speaker wire, an SO-239 connector and wire them together. We 3D printed a center element and insulators, but you can use scrap wood or plastic you have at home. If you decide to build, consider buying a balun like this one. It will help keep current off your feedline. We’ve seen them for $30 at Gigaparts.
Buying a dipole is not a bad investment and we saw several new ones at a hamfest. At a cost of $60 for a single band wire dipole, you might spend more in parts to build your own.

Let’s touch on one other type of horizontal wire antenna here, which is the Off Center Fed Dipole. This lets you have more flexibility on feed point placement. With a dipole you are committed to being in the middle. And an end fed has to be… well… at the end. We found the Maxcon OCF for less than $80 at a hamfest.
3. Ham sticks / Trapped Portable Dipoles
Having a half-wavelength of wire in the air for an antenna is really the best way to start. But not everyone can do this. So let’s talk about ham-sticks and trapped dipoles. These are dipole antennas that are “electrically” long, but physically shorter.
A hamstick dipole for 80 meters might only be 20 feet or so across. Whereas a wire dipole for 3.9 Megahertz should be around 100 feet longer. So, how does it work? By using coils or traps the antenna is electrically lengthened. You can see in the design of the hamstick the wire coiled around one end of the elements.
You can get into a single band ham stick style dipole for less than $100. That’s two sticks and the center mount where you connect your coax. If you want a different band, swap out the sticks.

A similar concept is a system called the Buddiepole, which is a trapped dipole. For less than $300 you get this very portable system. You adjust it by changing telescopic lengths, and moving a jumper around on a trap. By adding the right amount of length and coil in, you tune your antenna to be on frequency. Great options for small footprint operating, or going portable. Both of these are buy options versus something you will make at home.
TOP HAMSTICKS (Simple Vertical)
20m Shark Hamstick (only $30!) – Great, affordable option. Also suitable for mobile installations.
BEST TRAPPED DIPOLE
For a premium option, check out the Buddipole ($279)
4. Vertical
A vertical antenna is one where your driven element goes up instead of out. It can definitely be a space saver and is good for many different bands. Many hams find the 33-foot vertical to be a sweet spot for size. That represents a quarter-wavelength of the 40 meter band.
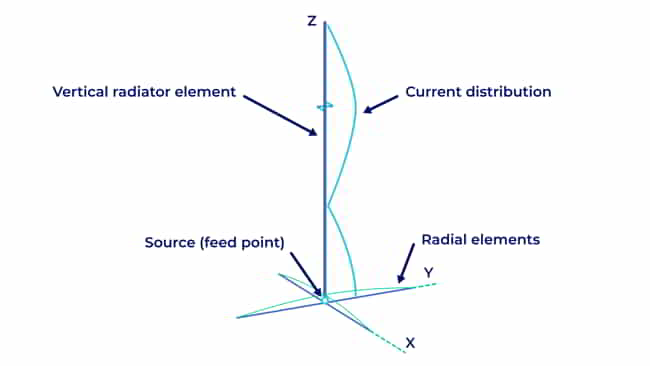
Getting a wire up and down in a tree is an easy part, but radials are an important part of this antenna’s design. Think of a vertical as a dipole turned at 90 degrees. When you do that you see the radials represent half of the antenna’s performance. There are many ways to do radials. Some use wires at different wavelengths to help bring in different bands. Some POTA hams use mesh as a broadband set of radials.
This project could be one you build or buy. One thing you may want to invest in is the balun, which is where the coax connects to the antenna elements. DXEngineering has a nice article about selecting baluns. It covers a variety of antenna scenarios, including a quarter-wave-vertical.
If you are buying, shop around. Good commercial options start around $250 and go up, but there are a lot of options. We’ve seen a version with an inflatable vertical section for easy setup and tear down if that’s important.
Like the trapped horizontal antenna, you can get a trapped vertical for portability. We found a little telescoping antenna element with traps for around $60.
5. G5RV
How about taking some of the performance of a horizontal dipole and adding some of the space saving benefits of a vertical? A ham named Louis Varney combined lengths of wire for a dipole with some resonant ladder line. That created the antenna we know as a G5RV. It’s another very popular antenna among new hams.
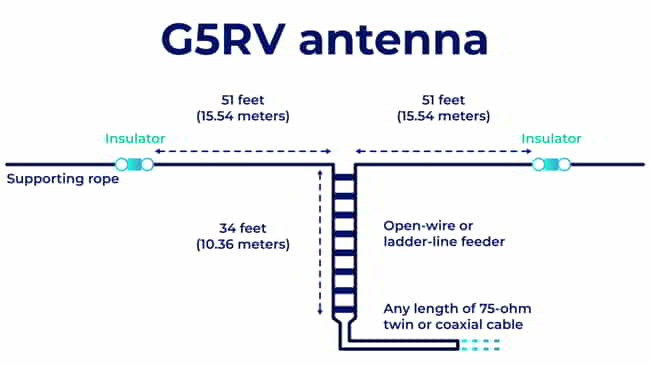
In its full 80-meter to 10-meter design configuration it measures about 102 feet across, and just under 30 feet high. You can fit this in your backyard several ways. Mount it horizontally, sloping or as an inverted V. When paired up with a tuner you get performance on a lot of bands.
You can build it yourself from plans right on Wikipedia, but for right around $110 you can pick up a kit ready to go. If you only have 50-ish feet available for installation, there is an alternative. The “G5RV Junior” which is a 40-10 meter option for less than $90.
Tools to help
Many times it’s not just getting an antenna installed, it’s getting it optimized. If an antenna’s SWR or feed point impedance is off, you will lose output power. That’s because mismatches get converted into heat instead of radio waves. So let’s talk through a few tools that will help you build or buy the best options.
If you want to know how much space you need for an antenna, we recommend using a Dipole Calculator. You can find them online, like this one at West Mountain Radio. If you prefer to do the math yourself, a halfwave dipole antenna length can be roughly calculated. Divide 468 by your desired frequency in Megahertz. Let’s do the calculations for a 10 meter dipole at 28.400 MHz. 468/28.4 = 16.47 feet rounded. Each element (side) would be a little less than 8-and-a-quarter feet.
We said that’s a rough calculation. Your performance will depend on height above ground and things like the velocity factor of the wire. That’s how well the wire conducts.
One of the things I like to do when building a dipole is get a close measurement using the formula. I leave it a little long and then adjust it as I hang it up using an antenna analyzer.
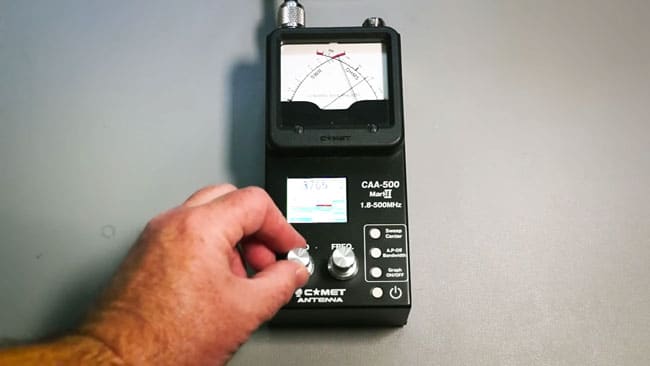
To adjust you raise the dipole up close to its operating position, then look at an analyzer. It will show you the SWR and impedance at that frequency. Take two measurements. One for your desired frequency and one for the “best” SWR nearby. If that best frequency is higher than your desired resonant frequency, your wire is too short. If the best frequency is lower, your wire is too long, and you need to trim it. We’ve discussed this among the elmers and getting below 1.5:1 on SWR is a good sweet spot.
An antenna analyzer runs $100-300, but it is a really good long term investment for your shack. If money is an issue, check with a local club or elmer to see if they have a loaner
Two more tools to help you out. First, consider getting into the theory of antenna design. Customize for things like height above ground and obstacles with modeling software. A free program like EZNEC runs on your computer and lets you design your antenna for the performance you want.
Finally, if all this is above your head because you just don’t remember it, don’t worry. This antenna information can be found in your General course studies. Go back and reread it! If you are a Ham Radio Prep student reread the General course lessons related to antennas. Those are Lessons 20 and 21. We also cover much more in the HF Master Class.
Aspirational Antennas
There are plenty of other antennas we didn’t cover. We skipped a few because they go a little bit beyond beginner level. We also passed on a few due to price or size.
Some quick notes though:
- Most of the antennas we covered don’t offer much additional gain. Gain is amplification in a direction. For that, look into Yagi antennas. They are more complex to set up and require some way to get them pointed in the right direction. However, you get more send and receive performance for your buck. Plus adding a Yagi is much less expensive than adding an amplifier to your rig.
- We skipped Mag Loops because of their price to performance ratio. They run about $300 for 25 watts out. Some like them for small space performance, so consider them as an alternative to something like hamsticks.
- Horizontal Loops are probably underrated! It’s a big project but if you can run 1 wire around your entire back yard or in your attic you have a horizontal loop antenna. The trade off is nice performance on many bands. These loops also tend to be quieter if you have the space to trade off.
There are books written on the hundreds of different antenna styles we didn’t cover. If you are trying to find just the right one for you, something like “Wire Antenna Classics” or the “HF Antenna Collection” might be in your club’s library to review.
Building antennas is also a great club project too. Or research online! For instance there are lots of “cousins” of the G5RV design just a few clicks away.
Building Your Own Antenna in a Pinch
We started off by saying that good antennas are important and we’re sticking with that. However, we also believe that any antenna is better than no antenna at all. To that point, we want to point you to the Strange Antenna Challenge. It’s a recurring event where people see just what they can use for antennas.

I participated in this with a local club and made 2 “strange” antennas. The first one was a vertical using a string of 40-ish Diet Soda cans. I made a few contacts around the US with that. The next year I came back with nothing but a roll of tinfoil. Folded and connected up as an inverted V-dipole, I worked DX more than 1,000 miles away in South America.
I’ve seen others use ladders, a sign for an ATM and one club member made a pretty effective 6 meter dipole from some crutches.

So, while a good antenna is important, ANY antenna may be even more important. No matter what you use, remember to be safe with power lines and RF safety too.
Recap
Before we go, let’s review those top 5 antennas for new HF stations.
The End Fed Half Wave for 80 meters is 135 feet and needs virtually no adjusting to get it on the air. It runs from $90 to $200.
A wire dipole is a super basic antenna that works well. For 80 meters, you’re also going to be around 135 feet total length. You can build or buy this one, but a packaged new single-band dipole starts at around $60.
Hamsticks or trapped dipoles can give you one band at a time in a space that’s 20-feet or so wide. A single band hamstick rig will cost around $100.
The 33-foot vertical is another basic staple of ham radio antennas. It’s 40-meters and higher in the basic configuration. Good commercial options start around $250 and go up.
Finally, Mr. Varney’s G5RV will fit in a space around 100 feet wide and 30 feet high. This compromise dipole is versatile. You can build it from plans from Wikipedia, or buy a packaged kit starting at just over $100.
We hope you get that antenna in the air. We hope to hear you on the air with it soon!


")